In 2024, the worldwide market for aerospace materials was estimated to be worth $44.25 billion. This figure is projected to nearly double by 2030, according to TechSci Research. Components of next-generation aircraft will need to resist severe thermal, mechanical and environmental conditions and therefore materials innovation is a priority. Understanding how materials behave under stress at the microscale and nanoscale is crucial to developing materials that can satisfy these needs. Here, Dr. Jan Kretschmer, Senior Sales Manager at Thermo Fisher Scientific, explores how advanced 3D imaging and microscopy techniques can help the aerospace engineers to gain such a detailed understanding and accelerate materials research and design.
As aircraft designs shift towards increased speed, more eco-friendly propulsion technologies and enhanced fuel efficiency, material characteristics must evolve in tandem. New processing techniques, heat treatments and alloy compositions are therefore constantly being investigated by researchers and aerospace engineers.
These changes consequently affect the microstructure of a material, which affects further grain orientation as well as nanoprecipitate distribution. Accelerating the research and development cycle requires an understanding of these changes and how they impact behaviour in the real world.
Seeing more with 3D imaging
For decades, materials research has relied on two-dimensional imaging techniques such as scanning electron microscopy (SEM) to evaluate alloy structure and composition. Powerful though it is, SEM does not image vital interior details, including where cracks extend beneath the surface within materials, sub-surface porosity and morphology of precipitates that develop during aging or thermal treatment.
Volumetric imaging enables deeper insights. Using focused ion beam milling and high-resolution 3D reconstruction, the internal structure of materials can be imaged. This enables a greater global understanding of material behaviour, as well as where failure mechanisms and microstructural patterns act directly to affect strength, fatigue resistance and thermal stability.
Preparing for precision
Successful 3D imaging outcomes are directly contingent on well-prepared samples. In aerospace coatings and alloys, preservation of proper geometry, orientation and structural integrity of prepared specimens is of principal importance. Conventional ion beam milling or traditional mechanical sectioning can be time-consuming with possible lack of accuracy and throughput abilities for current research workflows.
This is much tougher when dealing with samples that have complex characteristics, such as multi-layered coatings and fine-grained metallic systems. In such cases, the targeting requirement must be sharper, with minimal artefacts produced. Researchers are now looking toward plasma-based focused ion beam (PFIB) systems that use high-energy ion sources to shorten milling times while still offering controlled machining over larger volumes.
These systems assist in preparing large varieties of sample geometry suited to downstream analysis methods. Large-volume chunks, for instance, can be removed for microCT to allow non-destructive imaging in 3D of internal structures such as crack networks or delamination. The systems also enable thin lamellae to be gently removed from regions of interest and analysed via transmission electron microscopy (TEM) to show nanoscale grain structure, dislocations and precipitates.
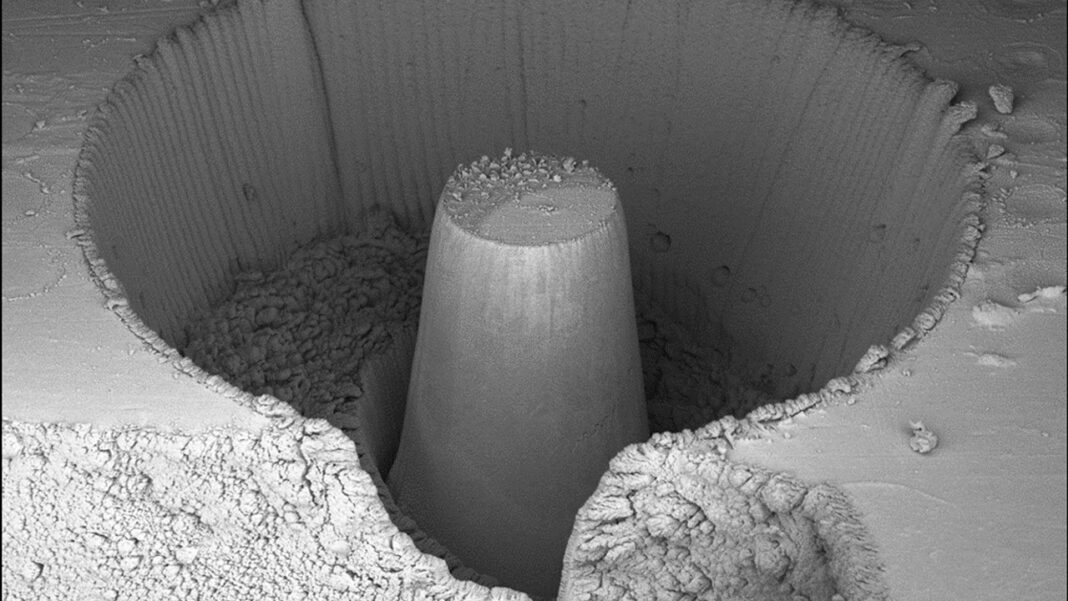
In one recent example, a 135 µm high nickel-based pillar was produced in under eight minutes using the Thermo Scientific™ Helios™ 5 Laser PFIB. High-volume milling like this supports iterative design workflows and helps materials researchers keep up with the rapid timelines in modern aerospace development.
Innovation at the nanoscale
Once samples are prepared, advanced imaging techniques can reveal the nanoscale features that govern a material’s performance. For example, scanning transmission electron microscopy (STEM) allows researchers to visualise fine details such as nanoprecipitates and dispersoids that form during different heat or aging treatments. These features are critical to the strength and thermal stability of aerospace alloys.
In a recent study of a heat-treated aluminium alloy, STEM imaging revealed the presence and distribution of dispersoids that would be difficult to resolve using standard SEM techniques. By combining this with energy-dispersive X-ray spectroscopy (EDS), researchers could map elemental composition across the sample. Thermo Scientific™ ChemiPhase™ software then further enhanced the analysis by automatically identifying distinct chemical phases based on EDS spectral data. In this case, the software confirmed the presence of four different dispersoid phases.
This kind of chemical phase mapping provides a fast and reliable way to understand how alloy treatments influence material structure, supporting decisions on processing conditions and composition in early-stage design.
As the aerospace sector advances toward faster, lighter and more sustainable aircraft, the materials to support these designs must evolve just as quickly. Instrumental to this evolution are tools that allow engineers to understand material structure, composition and performance in three dimensions and down to the nanoscale. By combining high-resolution imaging, quality sample preparation and automated chemical analysis, advanced microscopy solutions are helping aerospace researchers design better materials, faster.
Are you looking to enhance your aerospace materials research? Visit Thermo Fisher Scientific at Space Tech Expo, at stand 115, halls 4-7 to find out how we can support you.


